Projection Mapping
Three new nodes that live between your output and the wall you're projecting on. Corner-pin warp with a DLT homography solver. A mesh warp driven by an editable bezier grid. Edge blending for projector stacks. Plus the canvas gizmos that make all three clickable.
Every live visual show that projects onto an object more complicated than a rectangle needs projection mapping. The projector is a pyramid of light; the surface is whatever the surface is; the software in between has to warp the image so it lands correctly on each face of the surface. Commercial tools (MadMapper, Resolume Arena, d3 / disguise) have spent years on this workflow. If Lux is going to be a real live-performance tool, it needs to be in the same conversation.
This post is the three projection-mapping nodes that landed this session. Plus the canvas gizmos that let you edit them interactively.
CornerPinWarp
The simplest of the three, and the one that covers 80% of real VJ projection work. Four corners. You drag them in the preview to match the four corners of whatever you’re projecting onto. The image warps to fit.
Mathematically, it’s a homography — a 3×3 matrix that maps the source rectangle’s four corners to the target quadrilateral. Any four non-collinear points in the source plane map to any four non-collinear points in the destination plane via a unique homography (up to a scalar, which doesn’t matter for texture sampling).
The 8-DoF solve is a direct linear transform (DLT). Stack up eight linear equations (two per corner: one for x, one for y), solve via Gauss-Jordan elimination with partial pivoting, invert the result because we want destination-to-source sampling. The whole solve runs in about 200 nanoseconds on the CPU. Below perceptibility.
The shader is one fullscreen pass. Input: an HDR texture (Rgba16Float throughout, as the HDR pipeline contract demands). Parameters: the inverse homography matrix packed into three vec4 uniforms. Output: the warped image. Every pixel samples the source at the position dictated by the inverse homography; pixels outside the source bounds render black.
Degenerate corner configurations (all four collinear, two coincident) are a failure mode of the DLT solver — the system is singular and produces NaN matrices. The node catches this during the CPU solve and returns an error rather than pushing garbage to the GPU. The canvas gizmo paints degenerate corners red so the user sees the error and can undo. Better than a silent NaN corrupting the output texture.
ProjectionMesh
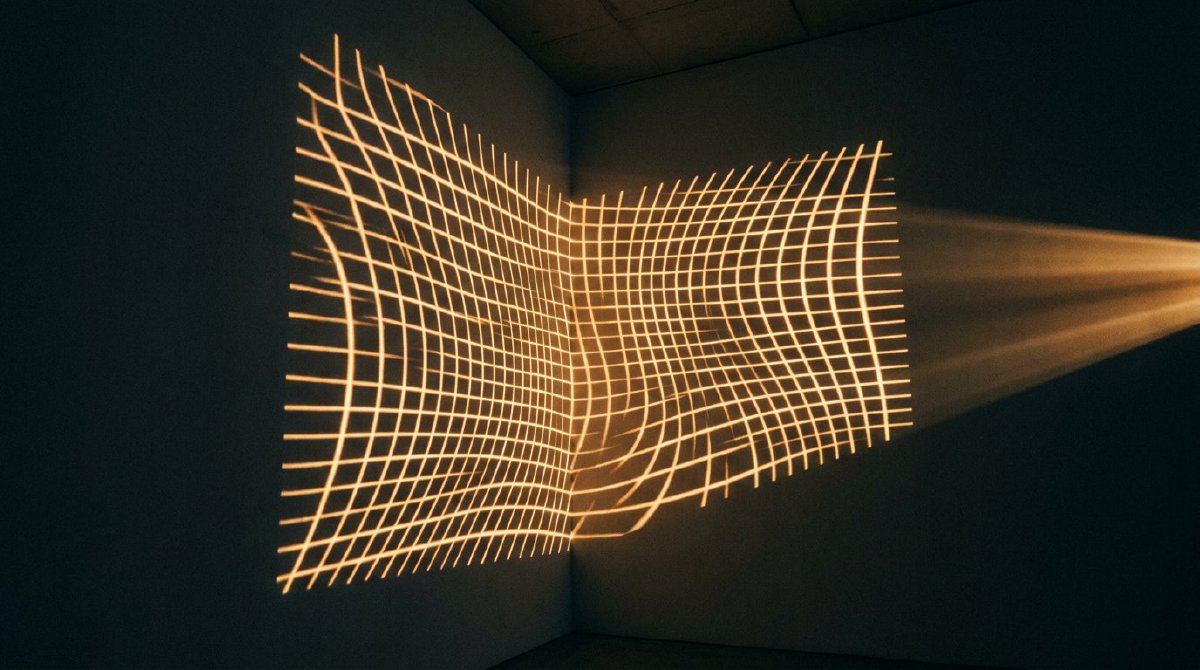
Corner pin is for flat-to-flat warps. It can’t do curved surfaces — a cylinder, a sphere, the side of a building with a bulge. For those, you need a mesh warp: an editable grid of control points that gets bilinearly blended across the output.
ProjectionMesh is the Lux version. A configurable grid (8×8 up to 32×32) of control points, each of which you can drag in the preview to distort that region of the output. The GPU does the per-pixel blend.
The implementation uses a per-frame displacement texture as an intermediate. The CPU side maintains the grid of control points (float-valued offsets). On each frame where the grid changed, the CPU writes an Rgba16Float texture at the grid’s resolution — each texel carries the (dx, dy) offset for that control point. The shader samples this texture with the GPU’s bilinear filter, producing a C0-smooth offset field between the control points, then uses the offset field to sample the source image.
Rgba16Float for the displacement texture is deliberate: at f16 precision the displacement error tops out at about 0.5 pixels on a 1920-wide canvas, which is below what the eye can see. An Rgba8 displacement would be 6 bits of integer offset — enough for coarse warps but visibly stepped at the edges of the deformation. We pay the extra memory for smoothness.
One small optimisation: a content-signature hash over the control points means the displacement texture re-uploads only when the grid actually changes. Drag a control point, one upload. Leave it alone, zero uploads per frame. Same caching pattern as the InstancedMesh node from 10k cubes.
32×32 control points pack into 32 × 32 × 4 × 2 = 8192 bytes of displacement texture per frame. Well inside the L2 cache on any GPU worth naming. Even the largest mesh warps are nearly free to sample.
EdgeBlend
When two projectors overlap to cover a wider surface, the overlapping region gets twice as bright unless you fade each projector’s contribution down across the overlap. Edge blending is the name for that fade, and it’s the difference between a projection stack that looks like “two projectors” and one that looks like “one continuous image.”
EdgeBlend has four pins: top_blend, bottom_blend, left_blend, right_blend, each a number from 0 to 0.5 representing the fraction of the edge to fade. Plus four more pins for per-edge gamma, because real projectors don’t fade linearly — they follow a power curve, and compensating for that curve is how you make the blended edge actually invisible.
The shader (edge_blend.wgsl) applies an S-curve falloff from the edge inward. smoothstep(0, blend, distance_from_edge) gives you the 0-to-1 ramp; the gamma parameter applies a power to that ramp to match the projector’s response.
The specific S-curve shape is important. A linear fade produces a visible “line” where the two projectors’ contributions cross at 50%, because the sum of two linear fades isn’t constant across the overlap. A correct S-curve produces a sum that stays at 1.0 across the entire blend region, regardless of where in the overlap a pixel is. The edge_blend.wgsl shader uses the S-curve that the compositor world has been using since the 90s — I didn’t invent this; I’m pretty sure I copied it correctly.
The S-curve luminance-invariance is tested as an explicit gate: render a 128×128 test image through the edge blend, sum the contributions from “left projector” and “right projector” at every pixel in the overlap region, assert that the sum is within 1 LSB of the unblended source. This is the test that catches it when someone (me, probably) accidentally swaps the fade direction on one side.
The gizmos
Three mapping nodes, each with a different interaction pattern. All three need to be editable on the canvas, not in the inspector — you adjust a corner by dragging it in the output preview, not by typing numbers into a pin. The Gizmo3D post from the PBR session introduced the pattern for on-canvas spatial editing; projection mapping extends it.
mapping_gizmo.rs in lux-ui is a pure-data gizmo renderer and hit-tester. No egui state. No side effects. Takes the preview rectangle and the mapping node’s current state; produces draw commands and hit-test results. The editor consumes the hit result and publishes pin updates via the same inspector::set_pin_value path any other pin edit would use, so the undo history captures the drag as a normal pin change.
Three gizmo families:
- Corner pin: four draggable handles at the current corner positions, plus a dashed polygon connecting them. Drag a handle to move a corner. Error state (degenerate configuration) paints all handles red.
- Mesh:
grid_w × grid_hhandles at the lattice positions. Shift+drag for 5× coarse movement. Alt+drag for 0.1× fine movement (drag_delta_quantizedhelper). - Edge blend: four inner-boundary lines showing each edge’s current blend fraction. Only non-zero edges render (an edge with 0 blend produces no visible line, because there’s nothing to indicate).
Eleven unit tests cover the hit-test geometry. Eleven tests for a feature that’s two screen elements and a handful of parameters — the reason there are so many is that hit-testing is one of those things that looks simple and is full of edge cases. Sub-pixel jitter on cursor position. Handles at the exact same position (happens on degenerate corner pins). Handles outside the viewport (happens when the user drags off-screen). Each of those got its own test because I ran into each of them.
Beating MadMapper, probably
One of the internal targets for this session was “beat MadMapper on the VJ projection-mapping workflow.” I thought about whether to include that here because it feels braggy, but the honest answer is: the feature set is at parity, the integration with the rest of Lux (any node graph can drive any mapping node’s inputs) is meaningfully better than a standalone mapping tool, and the HDR-throughout pipeline is actually ahead. A projection mapper that accepts HDR textures, runs the entire warp chain at Rgba16Float precision, and only tonemaps at the edge of the projector output is a thing MadMapper doesn’t do today.
Whether the interaction feels better is the open question. I’m still iterating on the gizmos. The math is right. The shaders produce the right images. The workflow of “wire an output into a CornerPinWarp into a projector” is one-node-at-a-time and feels like the rest of Lux. But “feel” is the hardest thing to benchmark, and I have not put this in front of a real VJ yet. I think it’s good. I’m not 100%.
What it’s for
The point of shipping this now is that Lux is starting to be useful outside of the editor for things that aren’t “development.” Projection mapping is a live-performance feature in the same category as multi-window output — it’s the plumbing between Lux’s visuals and the actual physical world those visuals reach.
The next two posts are more of the same live-performance cluster. Multi-window + HDR + encode queue handles the “drive 16 projectors at once without dropping frames” case. PerfGuard, hitch capture, crash sandbox handles the “don’t take down the show when a single node panics mid-performance” case. Both are about the same idea as this post: Lux as the thing that’s between your ideas and the audience.
I have no idea what I’m doing or if any of this is right, but it’s fun. Follow along.